Complete Installation Guide for Colour Stone Coated Metal Roof Tiles: A Professional Handbook for Contractors and Wholesalers
Published by: Roofing Technical Department
Date: June 26, 2026
Reading Time: 8 minutes
Table of Contents
1.Preface
2.General Construction Regulationsaccessories diagram
3.Accessories Diagram
4.Roof Structure Diagram
5.Stone Coated Metal Roof Tile Laying
6.Installation Tool
1.Preface
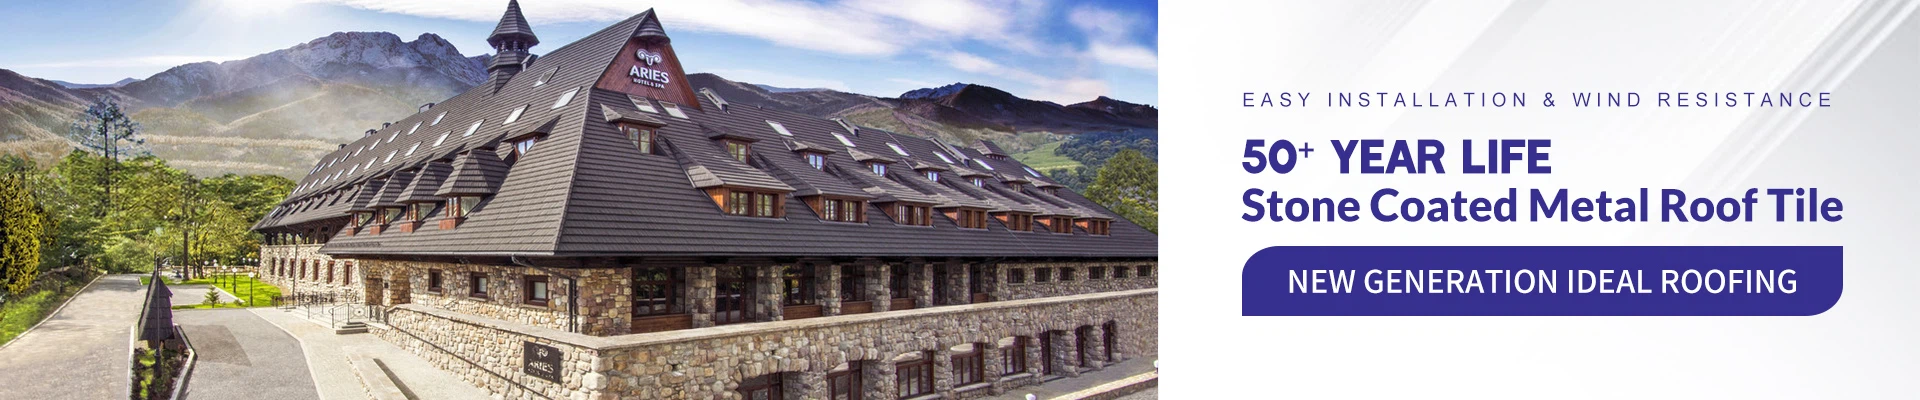
Stone coated metal roof tiles are made of aluminium-zinc-plated and other steel plates as the substrate,and color stone particle adhered with high-performance water-soluble resin adhesive.Stone coated metal roof tiles are suitable for the roofing of sloping roofs and local decoration of sloping roofs of villas,medium and high-grade houses, etc. They are also suitable for the flat to sloping and old roof renovation projects of buildings.Stone coated metal roof tiles are used for sloping roofs with a drainage slope of 15°-90°, and are a new type of roof tile with both decorative and waterproofing functions. The installation of tiles adopts a unique waterproof and windproof design and nail-fixing installation technology, which combines with the effective waterproofing system of sloping roofs, and not only beautifies the appearance of the building, but also improves the durability of the roof.In order to make high-quality, long-life metal roofing projects in the field of concrete, steel, and wood construction, this manual has been devel�
oped for use as a construction guide.
MATERIAL
This manual is applicable to the color stone metal tile as shown in Figure 1-1 and Figure 1-2, and the laying of other shapes of colored stone metal tile can refer to the requirements of this manual, and be adjusted locally in combination with the shape of the tile itself.

Table 1 stone coated metal roof tile length and width.

Noted:
The dimensional deviation between the length and width of the colored stone metal tile ±0.5%.
2.General Construction Regulationsaccessories diagram
The ambient temperature of stone coated metal roof tile construction should be 5-35℃. When the ambient temperature is lower than 5℃, enhanced protective measures should be taken.Construction worker should wear rubber-soled soft shoes during construction, try to avoid or reduce stepping on the stone coated metal roof tile surface that has been paved, for the parts that are easy to be stepped on, such as around the window, it is appropriate to pad soft material for temporary protection, so as not to damage the product. Through the roof waterproof layer of the pipeline, equipment, such as pre-processing parts must be installed before the construction of color stone roof tile install.
Stone coated metal roof tile installation is completed for the final product, to ensure that the installa tion process does not damage the stone coated metal roof tile surface is a very important part, so pay attention to the following points:
1, Gloves must be worn when transporting stone coated metal roof tile products on site, lifting tile must be tied firmly, should be lightly lifted and put lightly, can't drag the tile;
2,Construction workers walking on the tile, must be stepped on the tile groove and hanging roof strips on the combination of parts, It is strictly forbidden to jump, trample or knock on the tile
3,Clean up the metal filings and scraps on the plate surface, metal filings will be on the plate surface in cutting and drilling, and these metal filings and scraps must be removed in time to avoid causing rust to pollute the surface of the color stone coated metal roof tile;
3.Accessories Diagram
(size can be adjusted and customized according to specific needs)
4.Roof Structure Diagram

5.Stone Coated Metal Roof Tile Laying
First,Main Construction Process
1.According to the roof structure,determine the roof shape,determine the height and slope,and determine the construction material.
2.According to the construction plan,determine the connecting node of the beam frame and the roof on the spot,as well as the projection position of the positive ridge oblique ridge and draw a line mark on the existing roof base.
3.Beam frame and keel(along the water strip,battens)production and installation.
4.Color stone coated metal roof tile laying (gutter,eaves,main tile,gable,ridge tile).
5.Clean up the site (especially the tile surface shall not leave iron filings),repair the nail hole,and glue
the joints.
6.Acceptance and end of the project.

Second,Specific Instructions
1.Keel construction on the existing slope roof
(1)Frame keel and water strip installation:lay the keel on the contour line of the entire roof (ridge,eaves,gable,valley),and the specifications of the keel are the same as the specifications of the battens,and the simple specifications are not less than 40*40*2mm.Then lay the water strip in the water direction between the contour lines,and the spacing of the water strips is 750mm-2000mm,and the spacing of the water strips can be adjusted appropriately in combination with the keel specifications;
(2)Install the valley keel and battens on the roof composed of the water strip and the frame keel,and the gutter keel and battens keel should be on a horizontal plane.When installing battens,it should be noted that the spacing of the bottom row of battens is adjusted according to the size of the tiles extending out of the eaves,and then the other spacing is 365mm(if there is a change in the tile type and the practical width of the tile type changes,it should be adjusted according to the practical width);
(3)On the battens,install the keel of the ridge and gable,the gutter keel,the battens,the roof ridge keel,and the gable keel can be a specification,not less than 30mm*30mm*1mm.

Layout of water strips and battens
2.The flat roof is changed to a sloped roof, and the beam frame and keel are installed on the flat roof
(1) Install the beam frame, the truss size and position are determined according to the construction plan, and then the truss is made, and the truss is anchored on the flat roof (the anchor joint is water proof), and the specification of the truss keel is not less than 40mm*80mm*2mm;
(2) The beam frame of the whole roof is made by welding the truss and the roof contour line with each other, and the water strip is welded in the middle of the beam frame, and the specification of the water strip is not less than 40*40*2mm, and the spacing of the water strip is 750mm-2000mm;
(3) Install the gutter keel and the battens on the roof formed by the water strip and the beam frame, and the gutter keel and the battens keel should be on a horizontal plane. When installing battens, it should be noted that the spacing of the bottom row of battens is adjusted according to the size of the tiles extending out of the eaves, and then the other spacing is 365mm (if there is a change in the tile type and the practi cal width of the tile type changes, it should be adjusted according to the practical width);
(4) On the battens, install the keel of the roof ridge and gable. Gutter keel, battens, roof keel, gable keel can be a specification, not less than 30mm*30mm*1mm.

Install along the water strip and battens
3.Covering and refurbishing construction on the existing old tile surface
(1) First clean up the old tile of the old roof extending out of the cornice, determine the position and height of the new cornice, and make the skeleton of the new cornice with the keel;
(2) Taking the new cornice keel as the base point, the main keel and the water strip are installed along the roof contour line, which outlines the base surface of the new roof;
(3) Install battens and gutter keels on the water strips. The gutter keel and the battens keel should be ona horizontal plane. When installing battens, it should be noted that the spacing of the bottom row of battens is adjusted according to the size of the tiles extending out of the eaves, and then the other spacing is 365mm (if there is a change in the tile type and the practical width of the tile type changes, it should be adjusted according to the practical width);
(4) Install gables and ridge tile keels on battens. Gutter keel, hanging tile, roof keel, gable keel can be a specification, not less than 30mm*30mm*1mm.

4.Laying of Gutter Tiles
(1) The width of the side of the main tile is not less than 10mm at the gutter;
(2) The gutter board is installed from the bottom up, and the upper tile is pressed against the lower tile;
(3) The upper and lower lap overlap 50~100mm;
(4) The gutter board is made of color stone coated metal roof tile special gutter board for special nodes,and we will use customized special gutter board. The gutter board should be selected with the same batch of special accessories as the main tile, which can be customized if necessary;
(5)According to the specific requirements, the simple method can also be adopted, the simple method is: the main tile is not knocked flat and bent processing, but cut at the center line of the gutter, the tiles on both sides of the gutter are spliced at the center line of the gutter after cutting, and the flowing water flows into the gutter along the splicing seam.

5,Eave Installation
(1)The length of the main tile extending out of the eaves board should be 30mm-80mm;
(2)When the eaves have eaves gutters,the eaves tiles are laid out of the eaves and extend out of the eaves.30mm;
(3)When there is no eaves gutter,the eaves are sealed with special eaves boards made of color stone coated metal roof tiles.The upper end of the eaves is directly fixed on the tile hanging strips,and the lower end is fixed to the wall with full-length wooden strips.

6.Main Tile Laying
(1)Before installing the color stone coated metal roof tile,the roof should be checked first to ensure that the roof is flat.
(2)Each main tile should be fixed with no less than 6 nails,and no less than 3 nails on one side.
(3)When fixing color stone coated metal roof tiles,special nails for color stone coated metal roof tiles should be used.When the roof is a steel structure truss and metal square tubes are used as tile hanging strips,high-strength galvanized self-tapping screws need to be used for fixing.After nailing,the nail holes need to be repaired with a repair kit.

(4) When overlapping each row of main tiles, It should be deter mined from left to right, or from right to left, from bottom to top,
and staggered according to the specific roof structure. The princi ple is to reduce loss, improve efficiency, and ensure the beauty and flatness of the roof construction.
(5) After the color stone coated metal roof tiles are laid, the roof should be cleaned and inspected to ensure that the metal tiles are firmly fixed, the seal is tight and complete, and the surface is flat and undamaged.
7.Installation Barge Board Cover
(1)The folding width of the main tile side at the vertical wall is not less than 30mm.After the color stone coated metal roof tile is folded,the gable board is used and fixed on the tile battens on both sides with special nails for color stone coated metal tiles,and covers the folded part of the main tile.
(2)The height of the gable and ridge junction is higher than the ridge.
(3)The lower end of the gable should be sealed with a bend to make the lower end of the gable look solid and heavy.
8.Flashing Treatment
(1)At all overlaps between flashing boards and facade walls,the flashing boards should cover the upper folded part of the main tiles,and then be tightly sealed with neutral weather-resistant sealant to ensure that there are no leakage points;
(2)Use neutral weather-resistant sealant to seal the upper part of the flashing;
(3)Flashing board is a special flashing board for color stone coated metal roof tiles.

9.Installation Roof Ridge
(1)The ports on both sides of the ridge tile should be sealed,and the sealing should be tight,smooth and beautiful;
(2)The folded width of the main tile on the side of the ridge tile shall not be less than 30 mm;
(3)The ridge tiles should be overlapped tightly and evenly spaced;the joints between the ridge tiles and the ridge should be tight,straight and flat,without undulations or leakage.The joints between the ridge and the ridge should be sealed with sealing materials and covered with special tee fittings;
(4)The roof ridge tiles use special ridge tile accessories for color stone coated metal roof tiles;
(5)According to specific requirements,a simple method can also be used.The simple method is to not use the keel of the ridge tile,and the ridge tile is directly fixed on the tiles on both sides of the ridge.The nailing position should be where there is a battens,and it should be nailed on the battens(the simple method can save a lot of human resource and material resources,but it has great waterproof risks and reduces the service life,so the simple method is used in appropriate application scenarios).

10. Installation Around The Dormer Window
(1) The main tile is laid to the front edge of the dormer window, with a fold width of no less than 30mm, and then the flashing board is installed and sealed with sealing materials.
(2) The inclined gutter formed by the intersection of the dormer window and the main roof can refer to the laying method of the inclined gutter.

11,Installation Roof Lightning Rod
(1) Open a hole directly on the slope metal tile, then use a rubber screw hole sealing ring to cover the light ning protection strip bracket, directly pass it through the hole and fix it on the roof.
(2) Open a hole directly on the ridge round ridge tile, then use a rubber screw hole sealing ring to cover the lightning protection strip bracket, directly pass it through the hole and fix it on the ridge.
(3) At the junction of the color stone coated metal roof tile and the bracket at the hole, use sealing material to seal the edge tightly.

CONSTRUCTION QUALITY INSPECTION AND ACCEPTANCE AND MATTERSNEEDING ATTENTION
(1)Before the construction of color stone coated metal roof tiles,the roof waterproofing base, the pipes passing through the roof and other previous processes should be inspected and accepted.After completion,the quality certificate of color stone metal tiles and the site quality inspection documents must be provided.
(2)There should be no residual tiles after the roof is completed,and there should be no residual metal filings on the tiles.
(3)The fixing nails of color stone coated metal roof tiles must be nailed flat and firmly,and the nail caps are strictly prohibited from being loose.
6.Installation Tool
Patching tools
(glue,sand,nail)